Symmetric Encryption
Introduction
Since the ancient days, a concern for groups of people has been how to securely transmit a secret message securely from one place to another without interception or modification, for example for military purposes. These led to schemes such as the Caesar Cipher being developed.
In modern computer systems, computer security relies on confidentiality, i.e. being able to store or transmit information that can only be understood by authorized parties but not adversaries.
This is where encryption comes into play. Encryption is the process of encoding secret information into a concealed form that only the intended recipient(s) can decode back to the original.
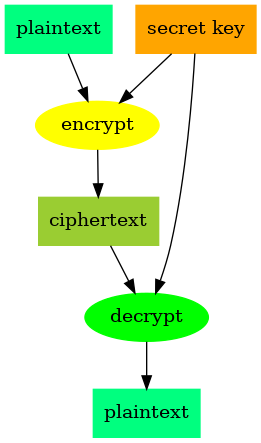
The original message is known as plaintext. It is encoded into ciphertext which is random gibberish to anyone but the authorized parties. A piece of information known as a secret key that is known only by the originator of the message and the intended recipient(s) is used to both encrypt and decrypt the message i.e turning it from plaintext to ciphertext, and back to plaintext.
Symmetric Encryption
There are two types of encryption, symmetric and asymmetric. In this article we’ll focus on symmetric encryption.
(Update: See article on asymmetric encryption here)
In symmetric encryption, a single key is used to both encrypt and decrypt the message as illustrated below.
This means that both the originator and the recipient of the message have to have the same key, and it has to have been shared securely between them, because anyone with the key can decrypt the ciphertext.
This needs to happen in a separate secure channel different from the one transmitting the ciphertext, otherwise anyone monitoring it can get the secret key as well as the ciphertext and decrypt it.
However, this is less of an issue where it is being used to encrypt stored information if only one person needs to both encrypt and decrypt it. The only consideration here is keeping the key safe, because if the key is lost, the encrypted information can be considered lost as well.
Examples in code
The following code examples demonstrate symmetric encryption in Python and JavaScript. Note that these are simple examples just to illustrate the concept. For production code, additional considerations need to be taken into account for robustness.
Python
from cryptography.fernet import Fernet


plaintext_in = "The quick brown fox jumps over the lazy dog"
secret_key = Fernet.generate_key()


def encrypt(plaintext_bytes, key):
    encrypter = Fernet(key)
    return encrypter.encrypt(plaintext_bytes)


input_bytes = bytes(plaintext_in, encoding="utf-8")
cipher_text = encrypt(input_bytes, secret_key)


def decrypt(cipher_text, key):
    decrypter = Fernet(key)
    return decrypter.decrypt(cipher_text)


output_bytes = decrypt(cipher_text, secret_key)
plaintext_out = str(output_bytes, encoding="utf-8")

assert plaintext_in == plaintext_out  # should be equal
In python, we use the third party library cryptography that
can be installed via:
pip install cryptography
It provides a class Fernet that conveniently hides all the lower
level details involved in symmetric encryption. Using it, we can
generate a secret key, and use the key to create objects for both
encrypting and decrypting the plaintext.
The plaintext in this case is a simple string, but it can be any kind of information e.g. sound, images and the like since the encryption process works on bytes.
Fernet will additionally encode the generated key and the ciphertext bytes into a strings of printable characters that can be conveniently transmitted over the network across different types of systems. Base64 encoding is used for this.
The Fernet class uses the algorithm AES 128 in CBC mode for symmetric encryption. The technical details can be found in its spec
JavaScript
const { createCipheriv, createDecipheriv, randomBytes } = await import('node:crypto');
const { Buffer } = await import ("node:buffer");

const plaintextIn = "The quick brown fox jumps over the lazy dog";
const secretKey = randomBytes(16);
const initializationVector = randomBytes(16);

const encrypt = (plaintextBytes, secretKey, initializationVector) => {
    let cipher = createCipheriv('aes-128-cbc', secretKey, initializationVector);
    return Buffer.concat([
	cipher.update(plaintextBytes),
	cipher.final()
    ]).toString("base64");
};

let bytesIn = Buffer.from(plaintextIn);
let cipherText = encrypt(bytesIn, secretKey, initializationVector);

const decrypt = (cipherText, secretKey, initializationVector) => {
    let decipher = createDecipheriv('aes-128-cbc', secretKey, initializationVector);
    return Buffer.concat([decipher.update(cipherText, "base64"), decipher.final()]);
};

let bytesOut = decrypt(cipherText, secretKey, initializationVector);
let plaintextOut = bytesOut.toString('utf8');

console.assert(plaintextIn == plaintextOut);  // should be equal
In JavaScript, we use the crypto module that is distributed by
default with NodeJS. It is a bit lower level that the Fernet class
we saw in Python as we have to implement a few things by hand that
Fernet did automatically.
We generate the secret key using randomBytes from the crypto
module. Similar the the python example, we’ll use the AES 128
algorithm in CBC mode, so the key is 128 bits (16 bytes * 8bits) long.
An additional detail that was implicit in the python example but is explicit here is the initialization vector. This is a random piece of information that is generated and used in each encryption operation. It is required both for encryption and decryption.
Its purpose is to randomize each ciphertext message transmitted across the network even if they have the same plaintext message. This prevents an adversary monitoring the network and collecting a large number of ciphertext messages from being able use this data to derive the secret key.
In the python example, the initialization vector is generated and attached to the ciphertext automatically, but in the JS example, we generate it separately.
NodeJs also uses separate functions for creating encryption and
decryption objects. We need to pass in the same algorithm, secret key
and intialization vector to both for encryption and decryption to
work. On each of the objects, we call method update any number of
times to add plaintext or ciphertext, and then call final to mark
the end of input. Using Buffer.concatenate, we combine the byte
objects output of each of the method calls into one.
Conclusion
This article discusses the basics of symmetric encryption and gives examples in Python and JavaScript. For a more in-depth exploration, checkout the CRYPTO101 course and the Cryptopals challenge.

